It is a gorgeous summer in The Pyrenees and many of our Dutch friends are visiting. They come to relax, swim in the lake, enjoy the views and see the vineyards and winery grow. Needless to say, we had fun and I had little time for bookbinding. But, when dear friend Natascha needed a simple travel journal, I wouldn't let her get away with buying a spiral-bound notebook, mass-produced in China.
So, I made her a 'quick and dirty' cahier, in less than an hour.

This was refreshing as many of my painted or appliqued books take me days, even weeks to make.. This fabric-covered cahier is simple but still entirely hand-made and bound, pretty to see and nice to touch. Make one yourself? Here's how!
You will need:
- 15 sheets of paper, white, coloured or both. I used A4 printer paper (w 297mm x h 210 or 11.7" x 8.3").
- cardstock or cardboard, same height as but a little wider than your paper.
- fabric, to cover cardstock, big enough to leave a margin of one or two cm around your cardstock. Iron creases out if necessary.
- cutting mat, sharp knife, pencil, ruler, and set square if you are a perfectionist.
- cotton thread, large needle, pair of scissors, one or two beads, paper piercer (optional).
- acid-free glue (for books or, cheaper, for wood), big brush.
- bonefolder or wrong side of a table knife.

Step by step:
1. Making the booka. Carefully fold your 15 sheets in half using a bonefolder or the blunt side of a table knife.
b. Collect these sheets, fold them into one another until you have what begins to look like a book. If you haven't done it already, cut your cardstock the same height and a little wider than your paper, using ruler, set square, knife and cutting mat. Fold in half and slip around your book.
c. Hold your book correct side up and you'll notice that the right margin (where you open your book) is uneven. Cut through cover and pages to make a straight edge. 2. Decorating the cover
a. Take your cover off of your pages again, squirt a royal amount of glue onto the front and spread out evenly with a brush (easier with a slightly damp brush). Leave to dry for a few seconds and press onto fabric.
b. Make sure you fold your cover before you glue the back to the fabric too, so it won't get too tight.
c. Cut the fabric off along the edges of your cover.

3. Preparing for binding
a. In the crease of your cover mark one cm from the top and one from the bottom. Between those two dots distribute two more so you create three intervals of the same length (with this size paper 6,33 cm each). You end up with 4 dots.
b. Take a needle (or paper piercer) and pierce through the dots.
c. Repeat this marking and piercing on the inside of your pages
(all at once). 4. Binding the book
a. Cut approximately two metres of cotton thread and put through the needle.
b. Pick up your book without cover. From the outside put the needle through the top hole (#1). Pull through and leave a tail dangling that is roughly twice the height of your book.
c. Fold your book back into its cover. From the inside pull needle through the second hole (#2). This time go through both book and cover.
d. From the outside pull needle through hole #3.
e. From the inside pull needle through hole #4.
f. Now go back up again. Put needle through #3 from the outside, then through #2 from the inside.
g. At the top hole, #1, only pierce through your pages, not through the cover. Your threads meet up again so now you can tie a knot
(left over right, right over left). The knot will be neatly hidden between pages and cover.

5. Finishing off: making a pagemarker
a. Take both threads over the top of your pages, place them along the inside fold.
b. A few cms below your book tie a knot, slip on some beads,
tie another knot and cut off excess thread. You now have a fully functional and pretty pagemarker.
c. Leave the booklet to dry for a while underneath a pile of books.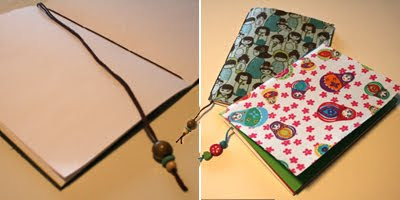 Et voilà: your own hand-made cahier or notebook, containing thirty pages (sixty counting both sides), ready to use!
I'd love to see pictures of yours, if you make one!

 Elzeline need not travel far for inspiration. In fact, many people came to us to spend their holidays picknicking by the lake, the river, under the cherry tree or in the ruins of a 1,000 year old castle.
 One friend delivered my sewing machine from Holland. Time to explore a whole new medium! I have lots of ideas but must first discover how to work it...
 My parents spoiled us with yummy cookies, foods, books, and gifts for our little girl. Even the tablecloth, with a game printed on, was in the box. And, there were fabrics, ribbons and an assortment of wallpaper samples for my books! I use the latter for the inside covers or first pages of my minibooks, I think this looks really funky:
 Life's also abundant out in the wild. We picked heaps and heaps of blackberries, a few figs, wild fennel... And now I'm happily jamming and chutneying away. A friend suggested blackberry ice cream,


 And... a personalized Paperfection gift book, hand-painted with the Trinité font and bound Coptic style. I hope I succeeded in making it more of a guy book than a girly journal by leaving out beads and frills and keeping it simple.
 The wine, Luscinia Canta, by the way, is a blend of merlot and cabernet sauvignon. It was made with loving care too, by my own sweetheart, in the Catalan Pyrenees.


 ...minibook.
 I just love coordinated sets of handmade items. So, my Easter Bunny suprise package for
 ...because a suprise package had been delivered for mom too! A box full of gorgeous Easter goodies! We´re taking part in the ´Secret Easter Bunny´, a gift exchange between European Etsy sellers organized and matched by
  Recently, I got to know Huismus a bit when I tagged her to show
  With an injured wrist she crocheted me a basket and filled it with chocolate eggs. She created a summer flower scarf for me in soft pastels AND made Merlijne a cute little handbag with handles, buttons, a little bunny and raisins.
 All presents were beautifully wrapped, tied and labeled with Huismus stickers and tags and there was a sweet hand-written card saying it puzzled her that I live in Spain but love to wear scarves! Just like I mused over the fact that a stewardess calls herself Huismus (a house sparrow but also someone who loves to be at home).


 Now the little one's bedroom features a stunning mobile: sixteen intricate origami balls dangling from a mosaic-tiled cross and finished off with beads and bells.
 Soon after, when everyone in the family had all the journals and origami decorations they could stand, we decided to set our creations loose in the larger world. Paperfection was born!

